Desk Management is the process of configuring how desks are set up. This includes removing or adding certain desks available. The procedures below will help users to interact with desks allocated through the floor.
Follow these steps to pre-assign desks in bulk:
- Log in to your FAST account.
- Click Admin > Desk Management > Preassigned Desk.

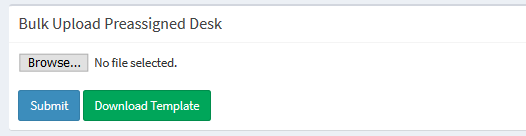
- Scroll down to the bottom of the page to the Bulk Upload Preassigned Desk section then click Download Template. The FAST User Preassigned Desk excel template will be downloaded to your desktop.
- Open the excel template and add the following information:
- UserName
- Location
- PreassignedDeskName
- FromDate
- ToDate
- Indicate which days the desk will be occupied by entering '1' under the Days columns. Enter '0' for the days the desks will not be used.
- Save the template then re-upload the file to FAST. Click the Choose File button under the Bulk Upload Preassigned Desk section, choose the saved file, then click Submit. When the template has been re-uploaded back to FAST, the confirmation message, Bulk User Preassigned Desk Successfully shall be displayed. Uploaded Pre-assigned Desks will be displayed on the Preassigned Desk(s) table.

NOTE: When uploading bulk template that includes the current date, this will overwrite the current desk allocation for that day so it's recommended that when you do an upload bulk upload, you only include future dates, or that you do it outside business hours so that it doesn't affect the desk allocation that day.
When you're releasing a preassigned the desk is no longer being used, follow these steps below:
- Log in to your FAST account.
- Click Admin > Desk Management > Preassigned Desk.
- Click the Release Desk button. A confirmation message will be displayed.

- Click the OK button. A confirmation dialogue message that the Preassigned Desk has been successfully released will be displayed.

NOTE: Preassigned Desk(s) table displays the CSR users that have active Preassigned Desks with a Release Desk action button for each user. - Go to Admin > Desk Management > Desk Management.

- Select the Edit icon of the floor map in which the employee was unassigned.

- Select the user in the drop-down menu then click Find.

NOTE: A dialog box will appear indicating that the user has not been assigned to any desk. This should confirm that the preassigned desk has been released.
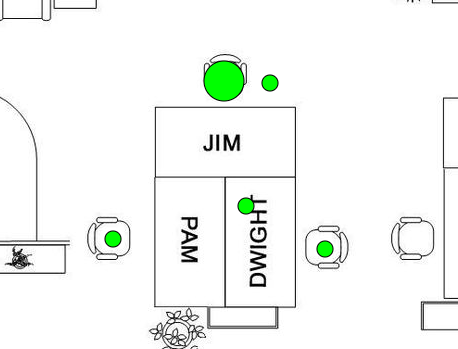
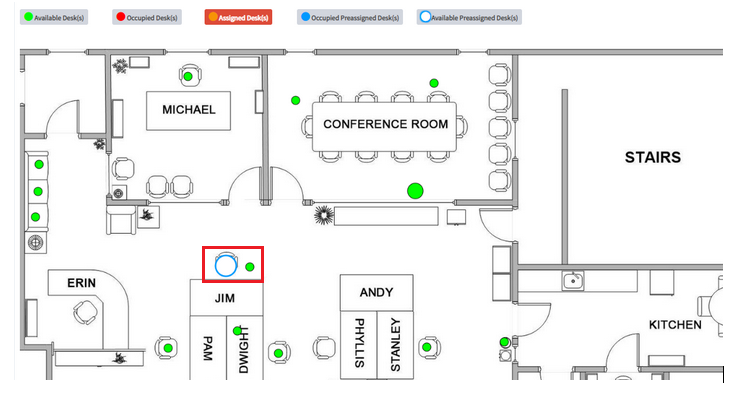
Before - Desk is pre-assigned to a user After - Desk has been released 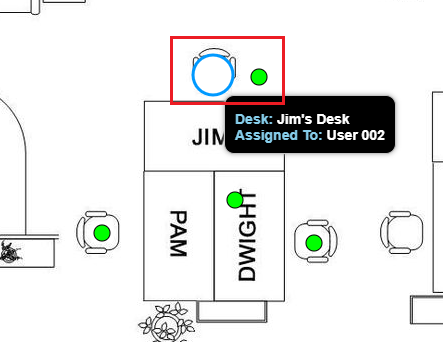
To add a new desk to the floor, take the following steps:
-
Log in to your FAST account.
-
Go to Admin > Desk Management > Desk Management.
- Click the Add/Edit Desk(s) icon.

- Right-click on the map where you want to add a desk then click Add New Desk.

- Fill out the relevant fields in the dialogue box then click the Submit button.

Desk Name: Provide a desk name (ensure to create a unique name as a duplicated name will not be accepted).
CoordX and CoordY - This is prepopulated based on where you clicked on the map.
Diameter - You may change this to adjust the size of the desk on the map.
Active: Tick this checkbox to activate the desk.
The following are informational fields only:
Phone No
Computer Name
Model
Serial No.
MAC Address
IP Address - Hover the cursor on the spot where you added the desk, you should see a green circle on the same spot indicating the new desk.

Follow the steps below to release a desk from a User.
- Log in to your FAST account.
- Go to Admin > Desk Management > Desk Management.
- Click the Edit icon for the relevant Floor Map.
- Select an occupied seat (booked or pre-assigned seat).
- Click the Release Desk button.

- Click the OK button to confirm the release of the desk.

A confirmation message is displayed, click OK.
The desk's circle will turn into green indicating that it is now available.
Follow the steps below to manually assign a desk to a User.
- Log in to your FAST account.
- Go to Admin > Desk Management > Desk Management.

- Click the Edit icon for the relevant Floor Map.
- Select an available seat.

- Select a user that you want to assign to the desk then click the Login on Behalf button.

- Click OK to confirm.

The desk is now assigned to that user as shown in the screenshot below.

To delete a desk, take the following steps:
-
Log in to your FAST account.
-
Select Desk Management under Admin > Desk Management.
- Click the Add/Edit Desks button.

- Click the desk that you want to remove.

- Click the Delete Desk button.

- Click the OK button to confirm deletion.

- A confirmation message shall be displayed. Click OK.
