
The Intel Collection Management module allows users to create custom survey or failure demand intel forms that can then be distributed to the users of the FAST site to be completed.
Form Creation and Design
Follow the steps below to create a collection survey or a failure demand form:
- Log in to your FAST account.
- Click Admin > Intel Collection Management on the main navigation sidebar.

- Click the Add New Form button.

- Type in the Form Title and Form Description then click the Add Question button.

- Select the form type from the drop-down menu.

- To finalise creating a form press Add Question.

- Select a question type from the drop-down menu. See the list below for more information on the question types:
Note: There is no limit to the number of questions you can add to the form.
-
Choose a question type (see below for more instructions).
The answers are shown in a checkbox format and you can add as many answers as desired. The screenshot below shows how this question will be displayed when inside the form.
 The Date & Time question type is used if you want the user to select date and time. The date is shown in a calendar format while the hour and minutes can be selected through the sliders.
 The screenshot below shows how this question will be displayed when inside the form. The advantage of using this format is is when the user accesses the data, the data will be in an appropriate format.
 The dropdown question type is shown in a drop-down format and the user can only select one answer.
 The screenshot below shows how this question will be displayed when inside the form.
 The dropdown (multi-select) question type answers are shown in a drop-down format, but unlike the regular Dropdown, this format enables the users to select more than one answer.
This is how the question will look to the users. They may select several answers by ticking the boxes. The multiple choices question type shows answers in a radio button format. The users are able to select one answer out of several choices.
 This is how the question will look to the users. They may only select one answer.
 The paragraph question type will show a free text box where users can enter a long text for their response.
 Enter the question in the field.
 This is how the question will look to the users. Note that users can extend this box by dragging the icon highlighted in the red box below.
 The short answer question type will show a text box. The user's answers can be validated depending on the validation type that you've selected. These validation types are No validation, Email Address Only, Numeric Input Only, and Phone Number Only.
 Select a question validation type as applicable.
 Note: The screenshot below shows how it will appear to the users.
 An error will occur if they enter the wrong validation format
To create a sub-question, follow the procedures below:
- There are two ways you can add a sub-question, you can either...
A. Hover over an answer then click the Plus button, or
B. Select Continue to next question > Add sub-question in the drop-down on the right panel.
- Type in the question then choose question type (in this example, Dropdown (Multi-select).
- Add the response options.

Note: Sub-questions can be added to sub-questions. Make sure that questions are saved and updated.
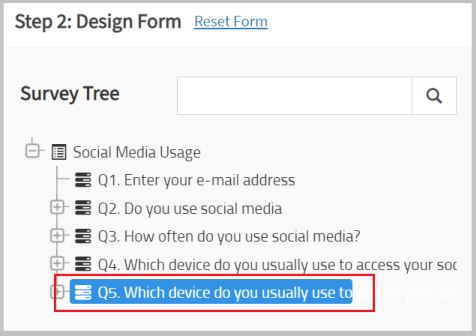
The screenshot below shows how it a sub-question will look inside the form. In this example, Q5 has a list of answers, which when selected will generate a sub-question.
As shown in the screenshot below, a sub-question, Q5.1 appears after choosing an answer.
- When you are done adding questions or you want to see the preview of how it will look to the users, click Update & test.

In the form, you will see that required questions are indicated with a red asterisk. If a question is not required there will be no red asterisk in the question.
If the question is required and the user did not answer it, the section will be highlighted in red to remind the user that they should answer the question to move on in the form. If the question is not required, the users may be able to skip it when filling out the form.
This is how it looks like when it's turned off, note that there is no red asterisk. This means that the users will be able to submit the form without answering this question.
- Hover over a question then click the delete icon.

- A confirmation box will appear, click Remove.

- The question has been removed. A confirmation box will be displayed.

- Click and drag the question to where you want it to be.

Note: this will change the numbering of the question, e.g. from Q5 it is now Q2. - A confirmation box will appear. The question has been moved.

- Hover over the question that you want to duplicate then click the duplicate icon.
Note: Duplicating a question will copy all the answers from the question being duplicated.
- The question has been duplicated.
- You can set the skip a question format by either...
A. Hovering over an answer under the Survey Tree section and clicking the Skip question button, or
B. Clicking Continue to next question > Go to question under the Edit Question pane.
- Click the drop-down menu then select the questions that will be skipped if a user chooses that specific response.

- Click Save.

As shown in the screenshot below, choosing No will skip questions.
This is how the form will be displayed to the user. When choosing No in Q3., Q4 and Q5 have been skipped and are therefore, not shown in the form. The user's answer has been directed to Q6.
Testing and Assigning the Form
- Click Update & test.

- Select the question and your response, as you would when answering a survey form.

- After filling out the form, click Test Validation.

If the form has been successfully submitted, a confirmation message will appear that the form passed the validation test.
If the form fails, a message will appear that it did not pass the validation test. This may happen when you miss answering a required question or if the short answer validation is wrong.
- You can assign the form by either...
A. Clicking the Assign Form after a successful form testing and validation, or
Click the I am done, assign form right now button.
B. Scrolling down to the Test and Assign Form section then clicking the Edit button.
- Select from the list of names under Assign To. Alternatively, you may type the name on the search box for easy searching then tick the radio button.

Note: You may also select users by Team managers or by Skills Sets in the drop-down options.
- Select the start and end date using the date selector. Use the sliders to select the time, then click Done.

Note: Once the end date has passed, the form will be deactivated and will no longer be visible to the users. To reactivate the form, the admin will need to reassign the form with a new end date. - Click the Assign button. A validation message will appear that the form has been assigned.

- Click Admin > Intel Collection Management on the main navigation sidebar.

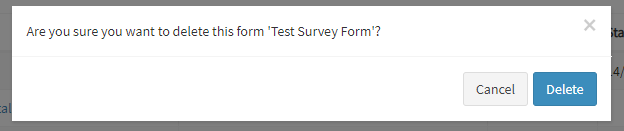
- Find the form that you want to delete then click the x button.

- Click the Delete button. A confirmation message will be displayed. Click OK to confirm.
- Now the form is deleted. Note that deleting the form will delete it from the FAST site and you will no longer be able to access or retrieve it.
- In the Intel Collection Management page, click the copy button in the form that you want to duplicate.

- A url link will be displayed. Click Copy.

- Share the link to a user with whom you want to share the form. If the user clicks this link, it will send them straight to the form.