Managing User Access is an administrator function designed to ensure that the correct number of accounts is stored within FAST and that the information is updated. Admins can create roles and configure the permissions that are applied to each individual FAST role. The User(s) Access section involves the following processes:
Activating/Editing a Single Account
To activate an account or register a new member in FAST, take the following steps:
- Log in to your FAST account.
- Go to Access Management > User(s) Access in the left navigation bar.

- Search the account that you want to approve or configure.
Note: You can search for a specific request by typing a string in the Search field. This action will display accounts matching the search criteria. For example, by typing ‘CSR’ in the Search field, it will display accounts matching the said term. Similarly, you can use other search criteria such as Created By, Account Type, Username, etc.
- Once you find the user account, click the Edit button.

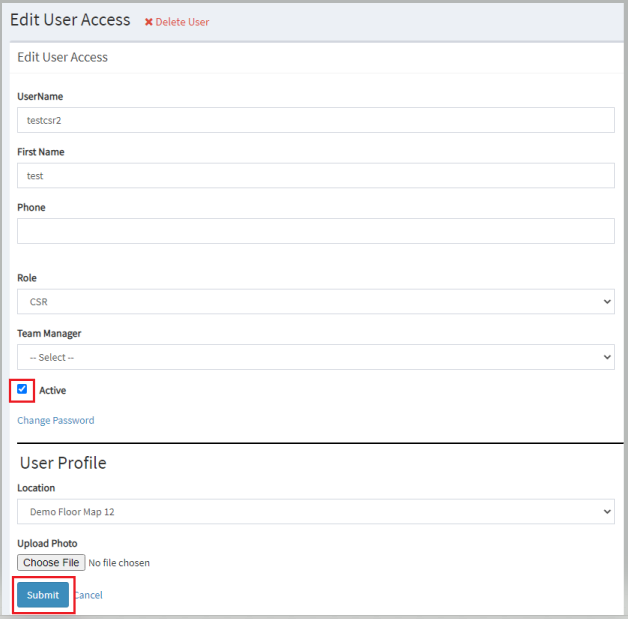
- The Edit user Access page will be displayed. For newly requested accounts, these fields (Phone, Mobile, Team Manager, and Skill Set fields) will be blank.

-
For an account to be activated, the Active tickbox must be checked, and a role must be applied to the account. On this page, users can also configure and make any updates necessary to the FAST system, e.g. changing the user name.
Field Description User Name The username for the user account. Email The email address of the user. First Name The first name of the user. Last Name The last name of the user. Phone The phone number of the user (optional). Mobile The mobile phone number of the user (optional). Role The role of the user. Team Manager The name of the team manager of the user (optional). Skill Set The skill set of the user (optional). Active Tick this check box to activate the user. Location The location of the user.
Note: FAST Azure account will automatically re-sync with Azure directory this means any changes the admin makes to these fields (these will be automatically replaced by the values in Azure each day when the refresh occurs):
- username
- first name
- last name
- mobile
- photo
- Scroll down to the User Profile section.
- Select a location for the user in the drop-down menu (optional).

- Click Submit.

After submitting, any changes made to this account will be applied.
Activating/Editing through Bulk Upload
When an admin would like to make bulk changes to account information whether approving or editing user values, this can be completed through bulk upload.
- Log in to your FAST account.
- Go to Access Management > User(s) Access in the left navigation bar.

- Click Download Template. It will download an excel file that contains all current user access information

- Open the file and make the update to the accounts as necessary.

Validation conditions for bulk upload
- No duplicate emails or usernames.
- Invalid values - Role and Location. They must be in the same format that already exists on the site. These values can be found in the Role(s) section or the Floor Management section respectively.
- Lookup values - Skillset and Team Manager - When you upload team manager and skill set values that are not already on the site, they will automatically be added to their respective lookup management lists.
- Required values - Username, Email, Role, First Name, and Last Name (cannot be left blank).
- Account Type - The Account Type value has to be either "Local" or "AD." When putting a value in this column this will determine the manner in which the user logs in. A FAST user will either by a local login that has a username and password stored within fast or an Azure Directory login that the user uses to log into FAST. For more information, see the User Account Configuration page.
-
Save the file.
-
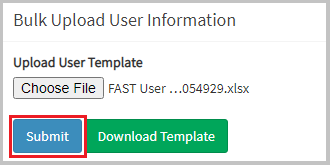
In the Manage User(s) Access section, click Choose File.

-
Select the file that you just saved.
 Note that when a user account is approved or initially created (with the approved status), the user will receive an email confirming this event.
 - Click Submit to upload the file.

To view user access, take the following steps:
- Go to the Access Management > User(s) Access in the left navigation bar.

- Search the account that you want to view.
Note: You can search for a specific account by typing a string in the Search field. This action will display accounts matching the search criteria. For example, by typing ‘CSR’ in the Search field, it will display accounts matching the said term. Similarly, you can use other search criteria such as Created By, Account Type, Username, etc.
- Click the View icon for the user account whose access you want to view. This shall display the View User Access pop-up.

-
You can now view the following user/role information:
- Username
- First name/last name
- Phone/mobile number
- Role
- Team Manager
- Skillset
- Active status

To delete a user account in FAST, take the following steps:
- Go to the Access Management > User(s) Access in the left navigation bar.

- Search the account that you want to delete.
Note: You can search for a specific account by typing a string in the Search field. This action will display accounts matching the search criteria. For example, by typing ‘CSR’ in the Search field, it will display accounts matching the said term. Similarly, you can use other search criteria such as Created By, Account Type, Username, etc.
- Click the Edit icon for the role you want to delete. This shall display the Edit User Access pop-up.

-
Click the Delete User button.

- Click OK to confirm.

A confirmation message, Successfully deleted user shall be displayed. The user account is now deleted.
To set a user account to inactive so that the user is unable to access the site, take the following steps:
- Log in to your FAST account.
- Go to Access Management > User(s) Access in the left navigation bar.

- Search the account that you want to approve or configure.
Note: You can search for a specific account by typing a string in the Search field. This action will display accounts matching the search criteria. For example, by typing ‘CSR’ in the Search field, it will display accounts matching the said term. Similarly, you can use other search criteria, such as Created By, Account Type, Username, etc.
- Once you find the user account, click the Edit button.

- Untick the Active tick box then click the Submit button. The user account is now inactive and unable to access the site.
