
To create a shift swap request, take the following steps:
- Log in to your FAST account.
- In the FAST dashboard click ShiftSwap in the left navigation pane.

- Click the Add New.

- Complete the fields.

- Request Type: The type of request. This will default to Shift Swap. This field is read-only.
- Requested By: The name of the person requesting the shift swap. This field is read-only.
- Request Status: The status of the shift swap. It defaults to Open status. This field is read-only.
- Requestor Message: This text box allows you to type a request for shift swap.
- Status: The status of the request. It defaults to New. This field is read-only.
- Assigned To: The person or role the shift swap request has been assigned to. This field is read-only.
- Assignee Message: This field allows the Assignee to type a message. This will be blank and can only be updated once the Assignee types a message.
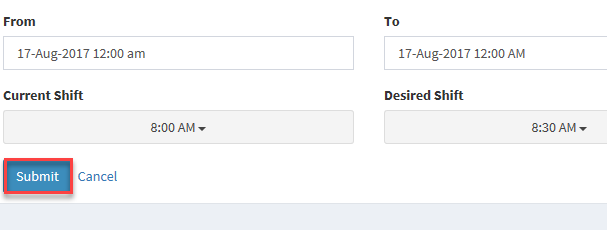
- From: The start date of the shift swap.
- To: The end date of the swap-shift.
- Current Shift: The current date of the shift. The Requestor can select multiple dates.
- Desired Shift: The date of the desired shift. The Requestor can select multiple dates.

You have the option to define the exact hour and minute for a shift swap.
- Click the Hour slider then drag and place it where you can see the time.
- Click the Done button.
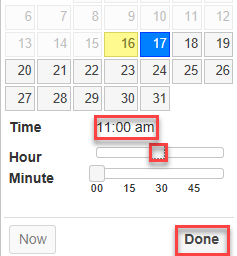
Note: Use the same steps as to define the minute.
- Click the Submit button.
A system message advising that the Shift swap is successfully updated will be generated.
The Requestor will then receive an email outlining the details of the shift swap.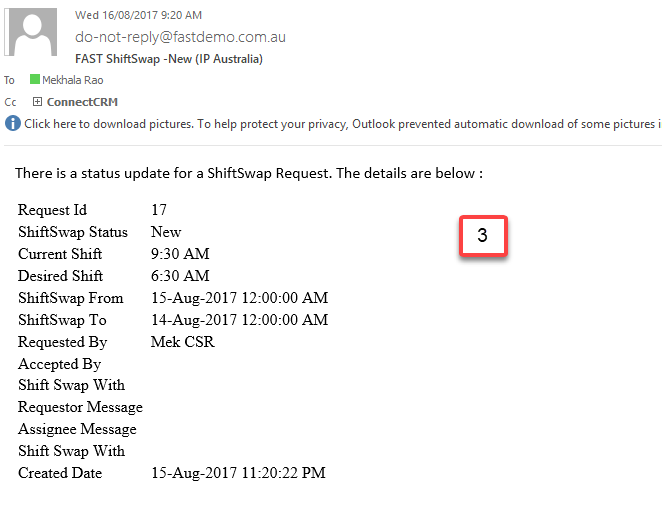
To accept a shift swap request, take the following steps:
- Go to FAST dashboard then click ShiftSwap in the side-bar menu.

- Find the shift swap that you want to process then click the Edit icon.

- Fill out the following fields:

Note: The fields from Request Type to Desired Shift are read-only fields.
- Request Type: The type of request. This will default to Shift Swap.
- Requested By: The name of the person requesting the shift swap.
- Request Status: The status of the shift swap. It defaults to Open status.
- Requestor Message: The message of the Requestor.
- Status: The status of the request. It defaults to New.
- Assigned To: The person or role the shift swap request has been assigned to.
- Assignee Message: The message of the Assignee. This will be blank and will only be updated once the assignee types a message.
- From: The start date of the shift swap.
- To: The end date of the shift swap.
- Current Shift: This field denotes the current shift of the requestor.
- Desired Shift: This field denotes the time of the desired shift.
- Responder shift status: The status of the response. Select Accepted.
- Responder Message: This text bow allows the Responder to type a message.
- Click the Submit button.

A system message shall be displayed advising that the Shift swap is successfully updated. The shift swap request will then be removed from the list of tasks.
The Requestor and the Responder will receive an email outlining the details of the shift swap.
To confirm a shift swap request, take the following steps:
- Go to FAST dashboard then click ShiftSwap in the side-bar menu.

- Find the relevant shift swap request and select the edit icon click the Edit icon.

- Scroll down to the Responder Info section and update the following:

- Request Status: If the shift swap request has been accepted by the responder, it will show as Accepted. This field is read-only.
- Requested By: The message that the Responder has typed. This field is read-only.
- Request Status: The field allows the Requestor to confirm the acceptance. Select Confirm, if you want to confirm the shift swap or Decline if you do not want to swap the shift with the Responder.
- Click the Submit button.

A system message shall be displayed advising that the Shift swap is successfully updated. The shift swap request will then be removed from the list of tasks.
The Requestor and the Responder will receive an email outlining the details of the shift swap.
The Workforce Manager takes care of the approval of the shift swap request after reviewing and ensuring that all the business requirements governing a shift swap have been successfully met. There are 5 tasks that the Workforce Manager may choose depending on the result of the assessment of the request.
- Approve
- New
- On hold
- Rejected
- Request for further information
To process the approval of a shift swap request, take the following steps:
- Go to FAST dashboard then click ShiftSwap in the side-bar menu.

- Find the shift swap that you want to process then click the Download icon to assign the request to your queue.

- Complete the following fields:
Edit ShiftSwap
- Request Type: The type of request. This will default to Shift Swap. This field is read-only.
- Requested By: The name of the person requesting the shift swap. This field is read-only.
- Request Status: The status of the shift swap. It defaults to Open status. This field is read-only.
- Requestor Message: The message of the Requestor.
This field is read-only.
ShiftSwap

- Status: The status of the request (Approved, New, On hold, Rejected, Request for further information).
- Assigned To: The person or role the shift swap request has been assigned to. This field read-only.
- Assignee Message: The message of the Assignee. This will be blank and will only be updated once the assignee types a message. This field is read-only.
- From: The start date of the shift swap. This field is read-only.
- To: The end date of the shift swap. This field is read-only.
- Current Shift: This field denotes the current shift of the requestor. This field is read-only.
- Desired Shift: This field denotes the time of the desired shift. This field is read-only.
Responder Info
- Request shift status: The status of the response. Select Accepted.
- Responded By: The name of the Responder. This field is read-only.
- Responder Message: The message that the responder has typed. This field is read-only.
- Click the Submit button.

A system message shall be displayed advising that the Shift swap is successfully updated. The shift swap request will then be removed from the list of tasks.
The Requestor and the Responder will receive an email outlining the details of the shift swap.
Approving the shift swap request completes the lifecycle of a shift swap.